FLUX Image to Video: Animate a FLUX 3 First Frame
To turn a FLUX image into a video, make the still with a FLUX image model, upload it to an image-to-video tool and describe only the motion. We made a paper-boat frame with FLUX 3 Image and animated it with ClipTrend's AI image to video generator into a 5-second clip. Below are the exact prompts, settings and what came out.
Last updated: October 2, 2026 · about 6 min read
Can FLUX make videos?
Yes. Black Forest Labs offers FLUX 3 Video for generation from text and images. Its August 4, 2026 announcement says the video model is generally available through the BFL API and select partners.
FLUX image models produce stills. FLUX 3 Image, released on October 1, 2026, generates and edits images. This guide uses that image model for the first frame and MiniMax H3 in ClipTrend for the motion. Keeping those steps separate lets you review the composition before animating it.
| Step | Tool | What you control |
|---|---|---|
| 1. First frame | A FLUX image model | Subject, composition, light, aspect ratio |
| 2. Motion | An image-to-video model | What moves, camera move, duration, resolution |
| 3. Review | Your eyes | Drift, warping, lost details |
Step 1: Generate a first frame with FLUX 3 Image
We generated the first frame with FLUX 3 Image at 1K in 16:9. If you want the same model in a browser, flux-3image is an independent FLUX 3 Image web app; it isn't affiliated with Black Forest Labs.
Prompt: A folded white paper boat floating on a rain puddle in a cobblestone alley just after a rain shower, early morning sun low behind it, golden reflections and tiny ripples on the water, wet stones, shallow depth of field, low camera angle at water level, cinematic film still.
Settings: FLUX 3 Image, text to image, 1K, 16:9.
The hero image shows the generated still. The boat is centered in a shallow puddle, with visible paper folds, wet cobblestones and a bright reflection behind it. Here are the choices to consider when preparing a frame for animation:
- 16:9 from the start. Choose a supported aspect ratio that matches your intended video. Cropping a square frame into a wide one removes part of the scene and may cut off the subject.
- Leave room to move. The boat sits near the center, with visible water around it. Check that the subject has space in the direction you want it to move.
- Plan the reflections. This frame includes a strong reflection of the boat and the sunlight. Include those areas when checking the animation for unwanted changes.
- One clear subject. A single paper boat makes the intended action easy to describe. Start with one subject so you can judge its movement and shape without distractions.
What makes a good first frame is covered in more depth in the best first frame for image to video.
Step 2: Animate the frame in ClipTrend
We uploaded the FLUX 3 frame to ClipTrend's image-to-video tool and focused the prompt on the boat's movement, a raindrop and a camera push-in. The uploaded image supplies the starting composition.
Motion prompt: The paper boat drifts slowly forward across the puddle, small ripples spreading from its hull. A single raindrop falls from above and makes a ring on the water. The camera pushes in slowly at water level. Soft morning light, gentle reflections.
Settings: ClipTrend image to video, MiniMax H3, 768p, 5 seconds.
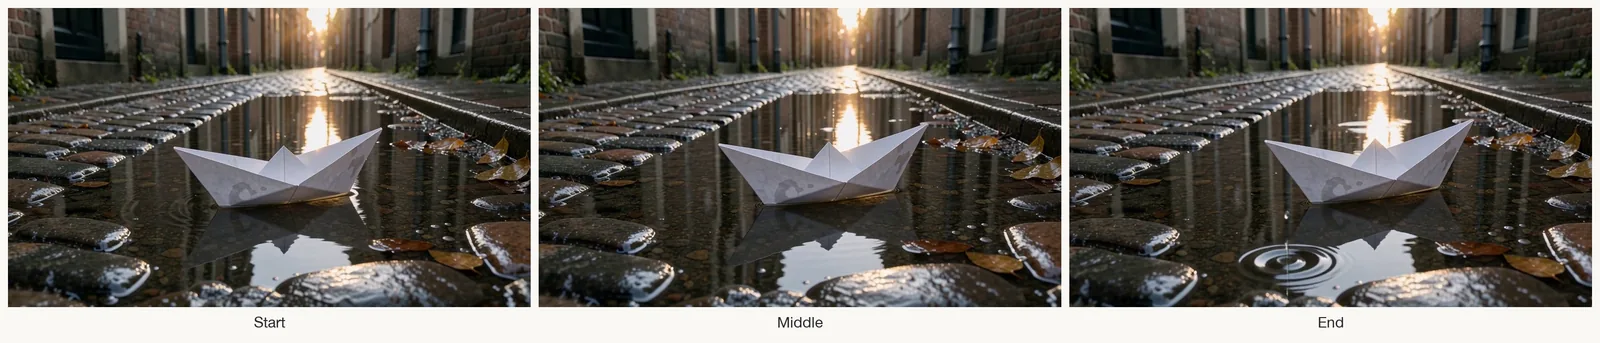
Start, middle and end of the 5-second MiniMax H3 clip made from the FLUX 3 Image still. The end frame shows a ripple in the foreground.
The boat drifts to the right and keeps its shape and folds through the whole clip, and its reflection moves with it. A raindrop ring appears in the foreground near the end. The camera push-in we asked for is very subtle.
The ripple sits toward the front of the frame rather than beside the boat. If placement matters, say it directly: "The raindrop lands just in front of the boat." For a stronger camera move, give it a clearer cue, such as "the camera moves steadily closer to the boat."
Writing a motion prompt for a FLUX first frame
These habits come from this example and are a good starting point:
- Lead with the movement. "The boat drifts forward" tells the model what should happen. Keep scene details brief unless they clarify the action or something you want to preserve.
- Keep the action focused. Here, the boat moves and a raindrop falls. If either action is missing, try it on its own before adding more events to the same clip.
- Give the camera its own instruction. Specify "the camera pushes in slowly" or "the camera stays still." Then check whether the result follows that instruction.
- Specify the pace you want. "Slowly" suits this quiet puddle scene. For a more energetic scene, describe the intended speed directly and check that the action fits within the clip.
- Describe a clear path. For this boat, specify a direction across the puddle. Check that the movement, water and reflection look consistent with one another.
Problems to check when animating FLUX images
If a clip misses the prompt, change one instruction at a time.
| Problem | What to check | What to try |
|---|---|---|
| The subject changes shape | Folds, edges and outlines across the clip | Simplify the action and check the new result |
| Nothing moves | Whether the prompt specifies an action | Name the subject and a verb: "the boat drifts" |
| The subject gets cropped | Input and output aspect ratios | Make the first frame at a supported target ratio |
| Text or logos change | Letters and marks throughout the clip | Add critical text or logos after animation |
| The ending misses your intended composition | Whether an end frame was supplied | Use a model that supports first and last frames |
If you need to control where the clip ends as well as where it starts, generate a second FLUX frame for the ending and follow our guide to AI video with a first and last frame. To continue a clip past five seconds, use video extend.
FLUX image to video vs. text to video
Text to video lets you begin with a written scene rather than a prepared image. A FLUX image to video workflow gives you a still to approve first, which helps when the look matters: a product, a character, a composition or a color. Compare the finished clip with the starting frame, since the video model can still drift.
If you'd rather start from a prompt alone, ClipTrend also has text to video, and you can make the first frame with ClipTrend's own text to image models instead of FLUX.
Frequently asked questions
Can FLUX turn an image into a video?
FLUX 3 Video supports image-to-video generation. FLUX image models, including FLUX 3 Image, output still images. This example uses FLUX 3 Image to create the starting frame, then MiniMax H3 in ClipTrend to animate it.
Which FLUX model should I use for the first frame?
We used FLUX 3 Image at 1K in 16:9. You can use another FLUX image model if its output suits your scene. Choose a supported aspect ratio that matches the video, and check the subject's shape, placement and surrounding space before animating it.
How long can a FLUX image to video clip be?
In this workflow, clip length depends on the video model you choose. Our example is a 5-second clip at 768p. For a longer sequence, you can try ClipTrend's video extend tool or use the last frame of one clip as the starting image for another. Check the join for abrupt changes.
Do I need to describe the whole scene again in the motion prompt?
You can focus on what moves, how the camera moves and the pace. The image provides the starting scene. Add a scene detail when it helps clarify your instruction, then check whether the result preserves it.
Related guides
- Try the AI image to video generator →
- The best first frame for image to video
- AI video with a first and last frame
- Image to video prompt examples
- Extend a clip with video extend
Make the frame, then the motion
Choose a FLUX still you want to animate, describe the movement, then review the clip for changes to the subject and background. Animate your first frame in ClipTrend →