Halloween Characters: Turn Your Photo Into a Classic Monster
To turn your photo into Halloween characters, open ClipTrend.ai's Halloween Characters page, upload a clear selfie, pick a character, and press Generate Image. The studio creates a portrait with character makeup, creature details, clothing, and a matching scene. Start with the werewolf or mummy, compare two or three looks using the same selfie, and keep your favorite photo. You can then turn that photo into an optional five-second video.
Updated October 14, 2026 · By the ClipTrend.ai Editorial Team
Disclosure: ClipTrend.ai provides this generator. The cover is a conceptual illustration of a selfie transformation, not a studio result.
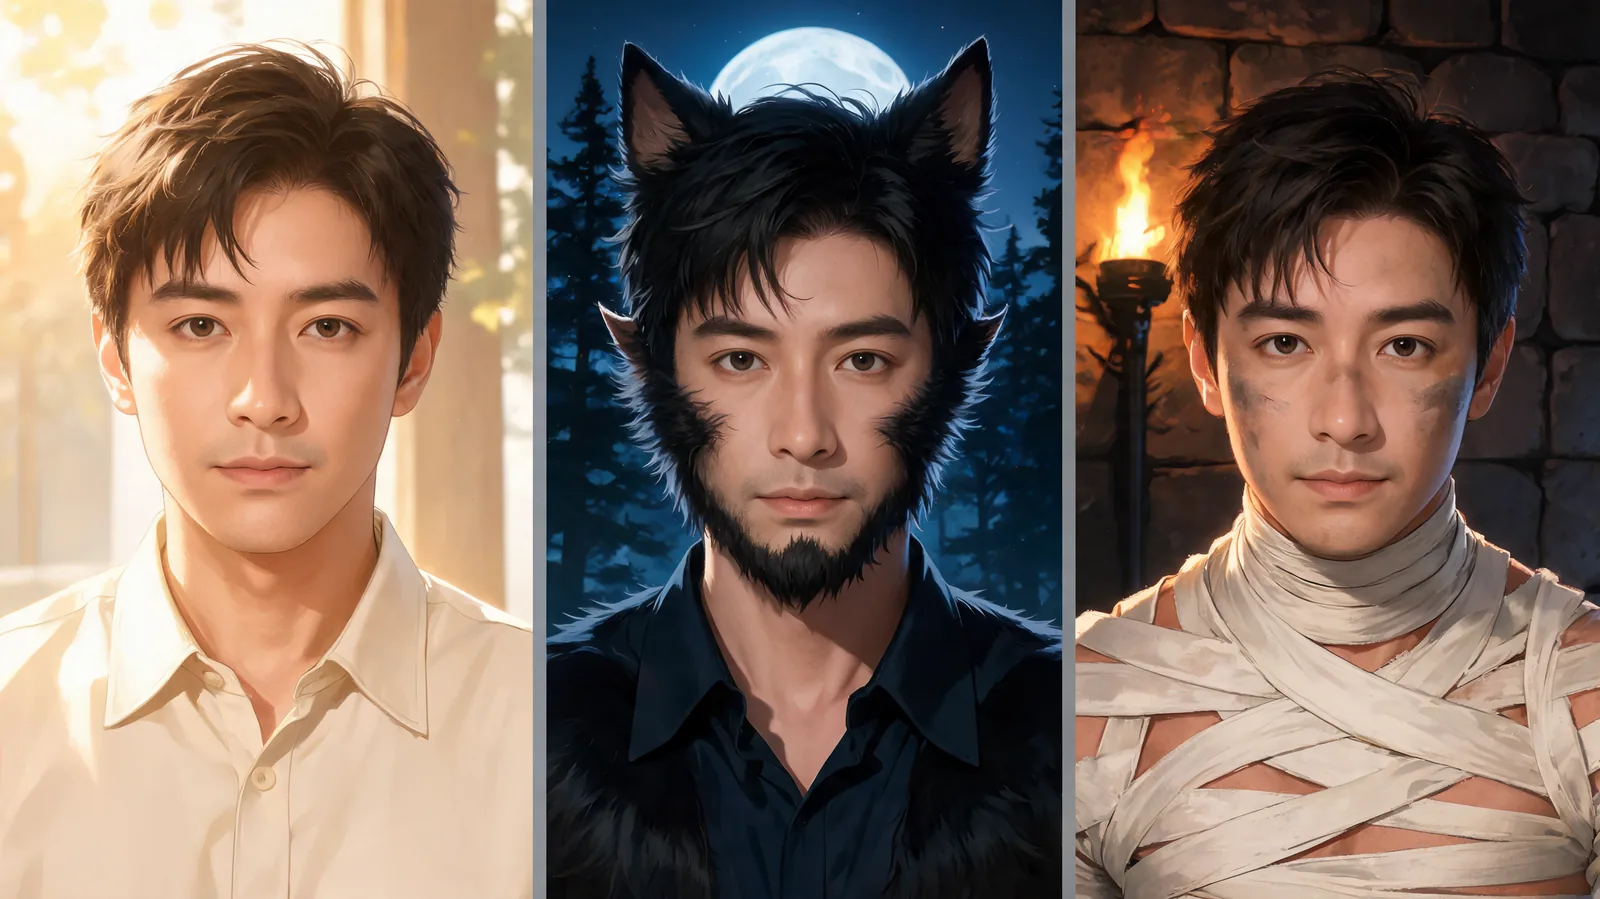
1. Choose a selfie with room around your face
Use a front-facing photograph of one person with the eyes, nose, mouth, and hairline easy to see. A head-and-shoulders portrait in even light is a useful starting point. Leave a little room above the head and beside the shoulders so you can judge how ears, headwear, and clothing relate to the person.
You do not need to wear a costume for the source photo. An ordinary shirt and a simple background keep your attention on the face when comparing results. A window-lit selfie is easier to review than a group party shot with colored lights, sunglasses, and a hand over one cheek.
Choose the expression you want to recognize afterward. A relaxed smile gives you a clear reference for the mouth and cheeks. Strong beauty filters, blur, and deep shadows can hide features you will need to compare with the generated portrait.
Only upload your own photo or a photo of someone who agreed to appear in the result. If it is for a public invitation or social post, ask about that use too. Agreeing to a private costume preview does not automatically mean agreeing to have it shared.
2. Look at the werewolf demonstration before choosing
As of October 14, 2026, the page opens with Werewolf selected in 1 Person mode. Its demonstration begins with a smiling man with curly hair in a navy hoodie. The character example shows him with fur, pointed ears, and a torn flannel shirt in a moonlit forest; the page also shows a short moving version.
That example establishes the direction of the effect: a recognizable person becomes a character through details around the face and a new setting. Your own result may differ in pose, accessories, or background. Use the demonstration to decide whether this is the kind of transformation you want, rather than expecting an identical picture.
The gallery offers 12 solo choices: werewolf, mummy, witch, vampire, ghost, skeleton, zombie, pirate, devil, fallen angel, scarecrow, and Day of the Dead. If you are choosing between their themes, the classic Halloween characters reference explains their signature looks and background.
3. Upload the selfie and select one character
Add your photograph to Upload your photo and confirm that the preview shows the intended person. Keep 1 Person selected for a solo transformation. Tap a character in the gallery to switch away from the default werewolf.
For a first comparison, choose characters that change different parts of the portrait. Werewolf emphasizes fur and ears; mummy emphasizes linen and dusty makeup; witch emphasizes a pointed hat and cottage setting. These give you more useful alternatives than several small variations of the same costume.
You can also use the studio's Describe it option for a generic character direction. Keep the request simple, such as “a friendly forest creature with furry ears, a dark green coat, and my face fully visible.” This is an example instruction, not an output made for this guide. Choose classic, non-branded characters and leave named film or game characters out of the request.
The AI Costume Generator hub explains the broader outfit-preview options. For this tutorial, stay focused on the character gallery: the makeup, creature features, and surroundings are central to the finished portrait.
4. Generate a photo, then inspect the creature details
Press Generate Image when the upload and selection are ready. Read the credit amount shown beside the Generate control before submitting. Check it again if you change the selection or move to video; the two actions have separate controls.
Wait for the photograph and open it at a size where you can inspect the face. Begin with the eyes, smile, jaw, and hairline, then move outward to costume details. The studio is designed to keep you recognizable, but likeness still needs your judgment.
For the werewolf, look for fur around the sideburns and neck, furry ears, amber eyes, and the flannel-and-forest setting. The face should still read as yours. If fur covers so much of the cheeks that you cannot recognize the person, use a clearer source or reconsider that result.
For the mummy, the intended look leaves the face uncovered while wrapping the body and hair in aged linen. Look at the eyes and mouth first, then check that the bandages form coherent layers. The dusty makeup and gold jewelry belong to the character styling; they should not distract from a face you cannot identify.
These are review criteria, not claims that every generated portrait has those problems. Reject a detail only when you actually see it.
5. Compare two or three characters on the same selfie
Keep the source photo fixed while changing the preset. You can then judge the character choice without also changing the lighting, camera angle, or expression. Save the accepted versions so you can view them together before deciding.
| Character | What to compare | Useful question |
|---|---|---|
| Werewolf | Fur, ears, eye color, forest scene | Does the creature detail still leave me recognizable? |
| Mummy | Linen layers, uncovered face, dusty makeup | Does the portrait read clearly without hiding the expression? |
| Witch | Hat silhouette, broom, cottage lighting | Can I see the eyes beneath the brim at the size I will use? |
Choose for the destination. A profile picture needs a readable face in a small crop. An invitation can show more of the scene. A werewolf's ears may disappear if you crop too tightly; a mummy's pale linen may need a darker surrounding layout to remain distinct.
If all versions have the same likeness problem, reconsider the selfie before making more variations. If one character works and another does not, keep the successful photo and change only the weaker direction. There is no need to animate every comparison.
6. Turn the accepted character photo into a short video
Once you have a portrait you want to keep, use the studio's video option to make a five-second vertical clip. The page offers Standard and HD choices; its HD option includes sound. Read the current selection beside the video Generate control before starting.
Watch the entire result, including the first and last moments. Movement can change how facial details, teeth, ears, and props appear. For a werewolf, pay attention to whether the face remains coherent as the expression changes. For a mummy, look at the relationship between the mouth and nearby wrappings.
Listen when you choose the sound option, and decide whether it suits your intended post. A good still portrait does not guarantee that every frame of its animated version will be equally convincing. Keep the photo if it serves your invitation or avatar better.
FAQ
Can I use a group photo for a solo character?
For 1 Person, use a clear photo of one person. The studio also offers 2 People with a separate upload for each subject and paired presets, but a crowded group photo is a poor source for the solo workflow.
Do I have to dress up before uploading my selfie?
No. You can start with ordinary clothing. The selected character supplies the costume direction, makeup, creature details, and scene.
Why does the portrait look less like me than the source?
First check whether blur, shadows, an extreme angle, or a filter hides your facial features in the upload. Try a clearer photo and inspect the next result; face preservation is a design goal, not a guarantee of a perfect match.
Can I share the character photo without making a video?
Yes. The still photograph is a complete result, and video is optional. Get the subject's approval before sharing and describe the image as an AI character transformation.
Pick the transformation you want to keep
Start with one clear selfie and two contrasting presets. Turn your photo into a Halloween character, keep the version that looks like you, and animate it only if movement adds something to your post.